Ever feel like getting fit at home is a huge puzzle? Maybe your place isn’t exactly palace-sized, gyms feel kinda awkward or just cost too much, and the idea of giant metal weights lurking in the corner isn’t appealing. If that sounds familiar, you’re in the right spot! We’re gonna talk about something super simple but surprisingly mighty: resistance bands. These stretchy helpers might just be the answer you’ve been looking for. Stick around, and you’ll find out why these bands are awesome for home workouts, which ones might be best for you, and exactly how to use them to get a great workout without needing a ton of space or cash. Get ready to feel strong and capable, right from your living room!
Why Bother With Bands? The Big Perks
Okay, so why choose stretchy bands over, say, shiny dumbbells or complicated machines? Well, resistance bands have some pretty sweet advantages, especially for home workouts. First off, they take up almost zero space. You could literally store your entire ‘gym’ in a small drawer or a bag. Imagine trying to do that with a squat rack! They’re also light and easy to pack, making them perfect travel buddies if you want to keep up your routine on the go – way easier than packing weights.
Cost is another big win. A whole set of bands often costs less than a single dumbbell. But maybe the coolest part is how they work. Unlike weights, where the resistance is constant, bands get tighter (and the exercise gets harder) the more you stretch them. This is called variable resistance, and it’s great for challenging your muscles through their full range of motion. Plus, they’re generally kinder on your joints than heavy lifting, giving you a solid workout with less impact. They’re super versatile too – you can use them for pretty much any muscle group.
Picking Your Perfect Band Buddy
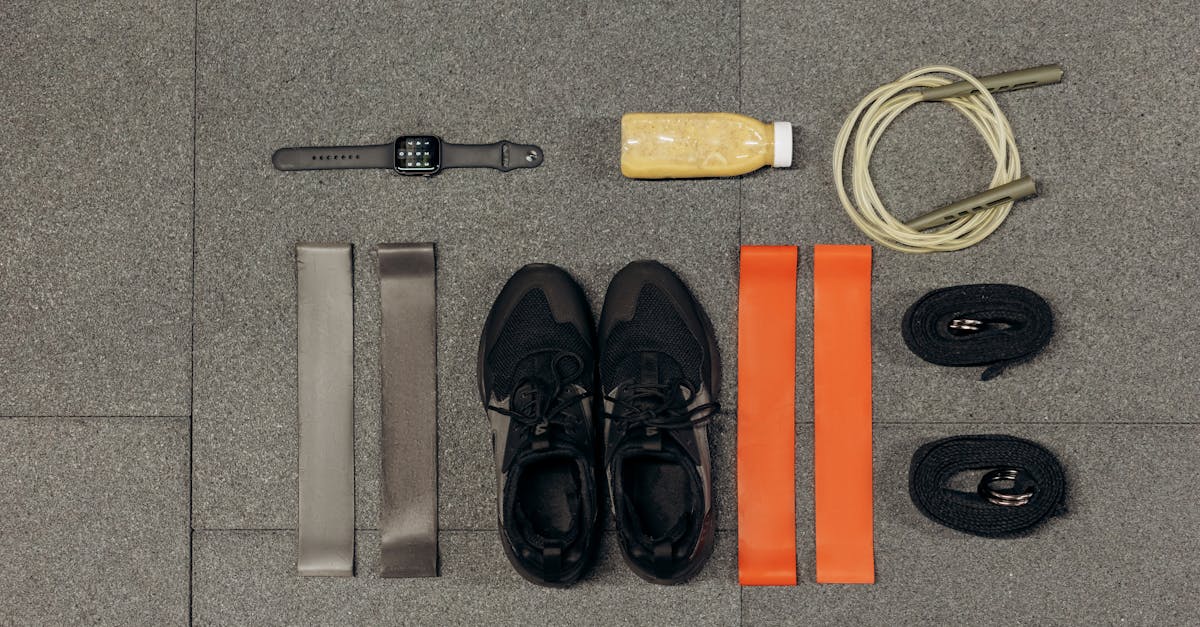
Walking into the world of resistance bands can feel a bit like choosing a character in a video game – lots of options! Let’s break down the main types:
Loop Bands: These look like giant rubber bands. You’ll often find thin ones (great for physical therapy type moves or adding a little challenge to stretches) and thicker, heavier ones (awesome for leg workouts like squats and hip thrusts).
Tube Bands with Handles: These are rubber tubes, usually with handles on the ends. They often come with attachments like door anchors or ankle straps, making them really good for mimicking gym machine exercises like chest presses, rows, or bicep curls.
Therapy Bands: These are long, flat, thin sheets of latex or non-latex material, often used in physical therapy. They don’t have handles and offer lighter resistance, perfect for rehab exercises or very specific muscle activation.
So, which one’s for you? Think about your current fitness level and what you want to do. If you’re starting out or need lighter resistance, tube bands with handles or thinner loop bands might be great. If you’re looking to really challenge your legs and glutes, thicker loop bands are fantastic. It’s like picking the right wrench for a bolt – different bands are suited for different jobs. Finding good quality bands is important too; you want something durable that won’t snap easily. Look for brands that specialize in reliable fitness gear to make sure you get a safe and effective workout.
Getting Started Safely: No Snapping Back!
Alright, before you start stretching those bands like crazy, let’s talk safety. It’s simple stuff, but super important. First, always check your bands before you use them. Look for any tiny tears, nicks, or worn spots. A band snapping mid-exercise is no fun at all – trust us! Think of it like checking your bike tires before a ride.
Next, if you’re anchoring the band (like looping it around a table leg or using a door anchor), make sure the anchor point is rock solid. You don’t want the table sliding across the room or the door flying open! When you’re doing the exercise, focus on smooth, controlled movements. Don’t just yank the band; feel the stretch and the resistance working your muscles. It’s better to use a lighter band with good form than a super heavy one with sloppy technique. Let’s imagine a quick fictional scene: picture someone using a slightly torn band wrapped around a wobbly chair leg, yanking as hard as they can. Recipe for disaster, right? Instead, be mindful, check your gear, use stable anchors, and control the movement. Safety first, gains second!
Upper Body Blitz: Arms, Shoulders, Back
Ready to work that upper body? Bands are amazing for this. Here are a few go-to moves you can do almost anywhere:
Bicep Curls: Stand on the middle of a tube band (or loop band). Hold the handles (or ends of the loop) with palms facing up. Keeping your elbows tucked into your sides, curl your hands up towards your shoulders. Slowly lower back down. Feel that squeeze in your biceps!
Overhead Press: Stand on the band like you did for curls. Hold the handles/ends at shoulder height, palms facing forward. Press your hands straight up overhead, fully extending your arms (but don’t lock your elbows). Slowly lower back to the starting position. This one targets your shoulders.
Bent-Over Rows: Stand on the band with feet hip-width apart, knees slightly bent. Hinge forward at your hips (keep your back straight!), holding the band handles/ends with arms extended towards the floor. Pull the handles/ends towards your chest, squeezing your shoulder blades together. Imagine you’re trying to pinch a pencil between them. Slowly lower back down. Great for your back muscles!
Chest Press: Wrap a tube or loop band around your upper back. Hold the handles/ends in front of your chest, elbows bent. Push your hands forward, extending your arms straight out in front of you, like you’re pushing something away. Slowly return to the start.
Remember to control the movement both ways – on the way up/out and on the way back down/in.
Lower Body Burn: Legs and Glutes
Don’t neglect those legs and glutes! Bands add a fantastic challenge here too.
Banded Squats: Place a loop band just above your knees. Stand with feet shoulder-width apart, toes pointing slightly out. Push your hips back and bend your knees like you’re sitting in a chair, keeping your chest up and pushing your knees out against the band. Go as low as you comfortably can, then push back up through your heels. The band forces your outer thigh and glute muscles to work harder to keep your knees aligned. You can also stand on a tube band and hold the handles at your shoulders for added resistance.
Glute Bridges: Lie on your back with knees bent, feet flat on the floor, hip-width apart. Place a loop band just above your knees. Push through your heels to lift your hips off the floor until your body forms a straight line from shoulders to knees. Actively push your knees out against the band at the top. Squeeze those glutes! Slowly lower back down.
Lateral Walks (Monster Walks): Place a loop band around your ankles or just above your knees. Get into a slight squat position. Step sideways, keeping tension on the band the whole time. Take several steps one way, then several steps back. You’ll feel this in your hips and outer thighs!
For these moves, really focus on the mind-muscle connection. Think about the muscles you’re trying to work and feel them engage.
Core Crushers: Working Your Middle
Your core isn’t just about looks; it’s the powerhouse that stabilizes your whole body. Bands are excellent for hitting those deep core muscles.
Pallof Press: Anchor a tube band at chest height to something stable (like a door anchor or sturdy pole). Stand sideways to the anchor point, feet shoulder-width apart, holding the handle with both hands at your chest. Step away from the anchor until there’s tension on the band. Brace your core and press the handle straight out in front of you, resisting the band’s pull trying to rotate you towards the anchor. Hold for a second, then slowly bring it back to your chest. Do both sides!
Wood Chops: Anchor the band high (or low). Stand sideways to the anchor. Grab the handle/end with both hands. If anchored high, start with hands up towards the anchor and pull diagonally down across your body, rotating your torso. If anchored low, start low and pull diagonally up. Control the movement back. This mimics a chopping motion and works your obliques (side abs).
Banded Crunches: Anchor the band high. Kneel facing away from the anchor, holding the band handles or ends by your head. Keeping your hips still, crunch down, bringing your elbows towards your knees, using your abs to pull against the band’s resistance. Slowly return up.
A strong core helps with posture, prevents back pain, and makes almost every other movement easier and safer. These band exercises really target that stability.
So, there you have it! Resistance bands are way more than just flimsy pieces of rubber. They’re affordable, space-saving powerhouses that can give you a seriously effective workout right in your own home. We’ve looked at why they’re so handy, the different types you can get, and how to use them safely. Plus, you now have a bunch of exercises to target your upper body, lower body, and core, proving you can get a full-body session with just these simple tools. Getting fit at home doesn’t need to be complicated or expensive. Grab some bands, start slow, focus on your form, and enjoy the feeling of getting stronger and healthier on your own terms. You’ve totally got this!